

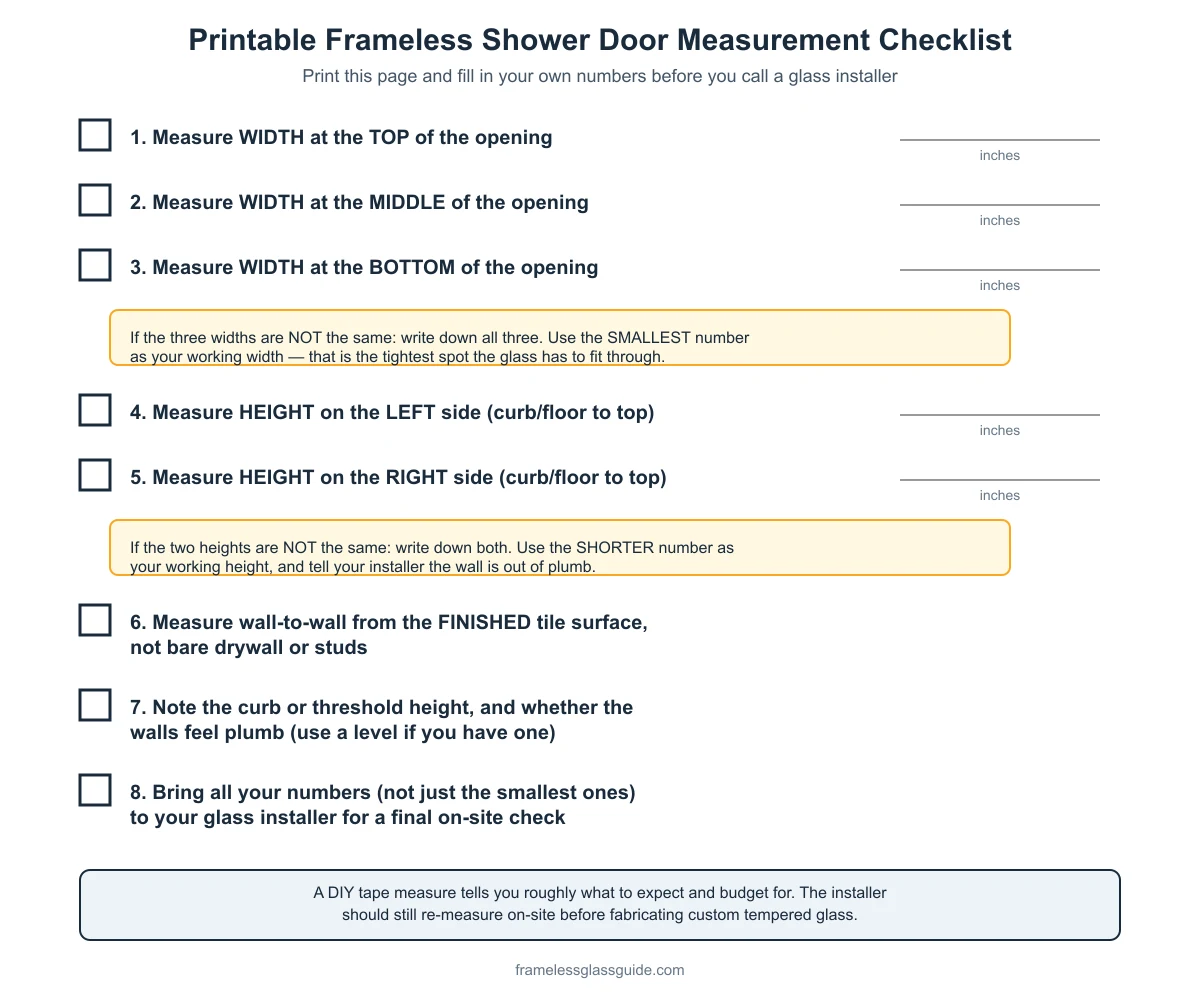
To measure for a frameless shower door, measure the width at the top, middle and bottom of the opening and the height on both sides, from the finished floor or curb to where the glass should end — then use the smallest width and the shorter height as your working numbers. Walls and floors are rarely perfectly square, especially in older bathrooms, so a single measurement in the middle of the opening can be misleading. Measuring at multiple points, and knowing what to do when they disagree, is what actually gets you an accurate order.
- Key takeaways
- Measure width at three heights (top, middle, bottom) and height on both sides (left, right) — don’t rely on one measurement.
- If your width readings differ, use the smallest one. If your height readings differ, use the shorter one. That’s the tightest dimension the glass physically has to fit into.
- Measure from the finished tile surface, not bare drywall or studs — a layer of tile and thinset changes the number.
- Print our measurement checklist below and bring every number, not just the smallest ones, to your installer — they’ll still re-measure on-site before fabricating custom tempered glass.
- Frameless glass is custom-cut to your opening, so an odd or non-standard size isn’t a problem the way it can be for off-the-shelf framed doors.

What do you actually need to measure?
Four sets of numbers, at minimum: the width of the opening at three heights, the height of the opening on both sides, the depth of any curb or threshold, and whether the walls are plumb (vertical) and the floor is level. A glass installer will confirm all of this on-site before ordering, but having your own numbers lets you get a realistic budget range and spot an unusual opening (a steep wall taper, a badly out-of-level curb) before the final site visit. If you haven’t yet decided on thickness, hardware or budget, our frameless shower door guide walks through those decisions before you get to measuring.
How do you measure width correctly?
With a tape measure, measure wall-to-wall across the opening at three points: near the top, at the middle, and near the bottom. Walls are not always perfectly parallel from top to bottom, so these three numbers can differ by a surprising amount in an older bathroom. Write down all three — don’t just take the middle one and assume it applies everywhere.
If the three widths are close enough to be the same measurement, you’re done with width. If they’re not the same, use the smallest of the three numbers as your working width. That’s the tightest spot the glass actually has to pass through; ordering to a larger number risks a panel that doesn’t fit.
How do you measure height correctly?
Measure vertically on both the left and right side of the opening, from the top of the finished curb or threshold (or the shower floor, if there’s no curb) up to where you want the top of the glass to end. As with width, the two numbers often differ slightly if the curb or floor isn’t perfectly level.
If the two heights are different, use the shorter of the two as your working height, and make a note that the wall or curb isn’t level on that side — that’s useful information for your installer, not just a number to quietly round down.

What if your top, middle and bottom readings don’t match?
This is the question existing how-to guides mention as a risk but rarely resolve clearly. Here’s the practical approach:
- Small differences (a sixteenth to an eighth of an inch): Common in almost any real bathroom. Use the smallest width / shorter height rule above and move on.
- Noticeable differences (a quarter inch or more): Write down all three width readings and both height readings, and point out specifically where the gap is biggest (top vs. bottom, left vs. right). This tells your installer the wall is out of square or out of plumb, not just “a little off,” and they may want to see it in person or adjust the fabrication plan (for example, scribing one edge of the glass to follow an uneven wall).
- Large differences, or a visibly tapered or bowed wall: Don’t try to average the numbers yourself. Get a licensed glass installer to measure on-site — this is exactly the situation where a custom, professionally measured panel is worth the cost over a stock-sized one.
What else should you note for your installer?
Beyond the raw numbers, write down: whether there’s a curb and how tall it is, whether the walls feel plumb if you hold a level against them, the location of any shower valve or fixed glass panel that has to be worked around, and which way a door needs to swing or slide given your bathroom layout (see our comparison of hinges vs. sliding track if you haven’t settled that yet). All of this affects what the installer orders and how they plan the fabrication.
Accurate measurements also matter for picking the right glass thickness. Frameless panels are typically fabricated from a minimum of 3/8″ tempered glass, with standard industry guidance calling for 3/8″ glass on panels up to roughly 84″ tall by 30″ wide with unsupported corners, and 1/2″ glass for larger panels up to about 120″ tall by 36″ wide, per Glass Magazine, the National Glass Association’s trade publication. Our glass thickness guide walks through that decision once you have your real opening size. Panel size also affects which federal glazing-safety category your enclosure falls under — enclosures larger than about 9 square feet, which covers most shower and tub doors, sit in the higher-impact testing category under the CPSC’s architectural glazing standard, one more reason to get the size right before ordering.
Common stock width categories (for reference only)
Because frameless glass is custom-cut, your exact opening size is not a problem the way it can be for pre-built framed units. That said, it helps to know the rough width categories that glass shops and hardware manufacturers commonly reference when discussing hinge and track hardware ratings:
| Rough opening width category | Typical use |
|---|---|
| Around 24″-28″ | Single door on a smaller stall, or one panel of a two-panel opening |
| Around 30″-36″ | Most common single hinged-door width |
| Around 40″-48″+ | Sliding/bypass doors, or a hinged door paired with a fixed panel |
These are reference categories, not a standard you need to match — your frameless glass is cut to your actual opening, whatever that number turns out to be.

Frequently asked questions
Should I measure before or after the tile is installed?
Always measure from the finished surface — after tile, stone, or other wall and floor finishes are in place, not from bare drywall or studs. Even a thin layer of tile and thinset changes the opening size enough to matter for a custom-cut glass panel.
What if my walls clearly aren’t square?
Measure at all three width points and both height points as described above, use the smallest width and shorter height, and specifically flag the size of the difference to your installer. A noticeably out-of-square opening may call for a scribed edge or a slightly different fabrication approach, which is easier to plan for if you’ve already described the problem accurately.
How much clearance does a hinged door need to swing?
Enough open floor space for the door to swing through its full arc without hitting a toilet, vanity, or opposite wall — check this in your own bathroom layout before committing to a hinged door over a sliding one. Our hinges vs. sliding track comparison covers this trade-off in more detail.
Do I need a professional to measure, or can I do it myself?
You can and should measure yourself first — it tells you roughly what to expect and lets you budget realistically. But a licensed glass installer should still re-measure on-site before fabricating the actual panel, since tempered glass can’t be trimmed or adjusted after the fact if a measurement is off.
Does it matter if I measure in inches or centimeters?
No, as long as you’re consistent and clear about which unit you’re using when you share numbers with your installer. Most U.S. glass shops will want inches and fractions of an inch (for example, 31 3/4″), so converting to that format before your call can save a round of back-and-forth.
Sources
- Glass Magazine (National Glass Association) — “Safe + Beautiful + Frameless”
- U.S. CPSC, 16 CFR Part 1201 — Safety Standard for Architectural Glazing Materials
framelessglassguide.com Editorial Team. Last updated: November 13, 2026.


[…] Answer: frameless shower glass layout options usually come down to inline panels, corner layouts, door-plus-panel setups, […]
[…] laceration hazards. A flat polished glass edge finish is the industry standard for exposed frameless shower installations. Quick Answer: for most exposed frameless shower panels, a flat polished edge is the […]